Adding Textures to the Eye Shader
- Select the Eye L object and open the Shader Editor.
- Load the Sclera Albedo image into the Image Texture node that’s connected to the Albedo Image input socket on the Eyeball node.
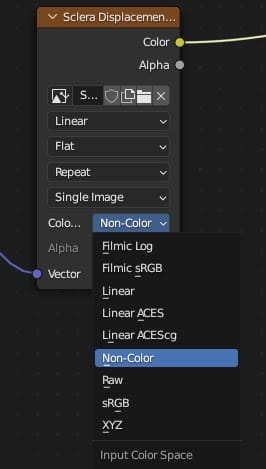
- Load the Sclera Displacement image into the Image Texture node that’s connected to the Displacement Image socket, and set its Color Space to Non-Color (see image on right).
- Select the Iris object.
- Load the Iris Melanin image into the Image Texture node that’s connected to the Melanin Image socket on the Iris node, and set its Color Space to Non-Color.
- Load the Fibres image into the Image Texture node that’s connected to the Fibres Image socket.
- Load one of the Iris Displacement images into the texture node that’s connected to the Displacement Image socket, and set its Color Space to Non-Color.
Iris Colours
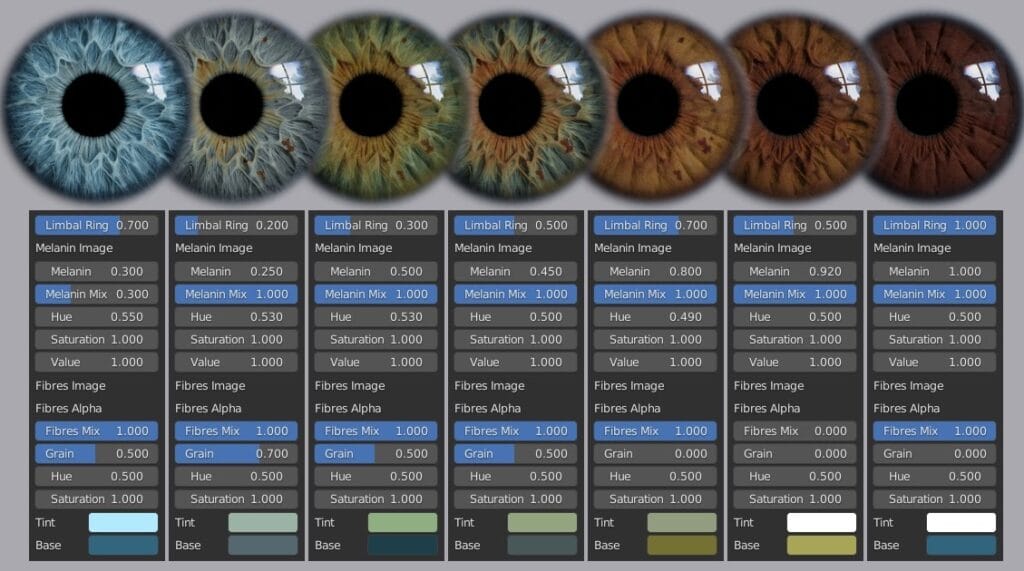
The following example settings can be applied using the Eye Shader’s Iris node (copy and paste the Tint and Base Hex values below into the Hex fields inside the colour pickers). They are configured for Refractive Caustics, so if you’re not using caustics you’ll need to increase the Melanin, Tint and Base values. Note that higher values than 1.0 can be entered in the Value fields.
Displacement Maps
Iris Displacement A and B are designed to align with each other and with the Fibres map, so they can be overlaid and selectively mixed in an image editor. Displacement C is an example of this, with added melanin freckles which align with the freckles in the Melanin map. To help give the fibres some volume, the Fibres image was also overlaid on the displacement at 10% opacity.
Rendering Object Subdivisions
For best results, make sure Displacement & Bump is selected in Material Properties > Settings > Surface > Displacement, and set the object’s subdivision level as high as your hardware permits (especially for the Iris mesh). Keep a close eye on your memory usage while testing subdivision levels, as overdoing it can quickly exceed the available RAM and cause the system to hang. For reference, a subdivision level of 7 for the Eye and 8 for the Iris is about the limit on an 8GB system when rendering a single eyeball.
Bear in mind that displacement detail may take a long time to resolve, especially when using denoising and caustics. When using denoising, make sure the Albedo and Normal passes are enabled.
Download here
Hand painted/sculpted iris and sclera textures, designed for use with the separately available Blender Eye Shader and model and the Universal Human rigs/meshes.
FEATURES
• 3 x iris height map variations (2K, 16 bit .png)
• Iris fibres albedo map (2K, 8 bit .png)
• Sclera height map (1K, 8 bit .png)
• Sclera albedo map (1K, 8 bit .png)
• Melanin map (2K, 8 bit .png)





Nếu có vấn đề gì đến link tải hãy liên hệ với tôi qua fanpages.
Xin cảm ơn.